 CRUD Operations using Knockout.js in MVC Applications
Here we starts....
Step 1:
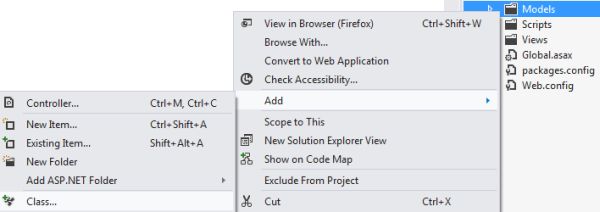
First of all we will work on the Model of our application. Right-click on the Model Folder of your application and choose to add a new class; and in similar way, we will add three classes to the Model.
Now opening one of the classes We will declare four variables named Id, Title, Class and Cost as follows :
public class Items
{
public int Id { get; set; }
public string Title { get; set; }
public string Class { get; set; }
public decimal Cost { get; set; }
}
. These variables will be used to show properties associated with various kinds of products.
Step 2:
Now opening the second class under the Model folder we will add this code:
interface IProductRepository
{
IEnumerable<Items> GetAll();
Items Get(int id);
Items Add(Items product);
bool Update(Items product);
bool Delete(int id);
}
Here We have used IEnumerable because it will allow the foreach loop to be applied on all the Items. Here methods have been declared for adding , updating , and deleting items. Delete will work on the ID of the Product.
Step 3 :
Now we can work on the third class of the Model and provide the following code in that class:
public class ProductRepository : IProductRepository
{
private List<Items> products = new List<Items>();
private int _prodId = 1;
public ProductRepository()
{
Add(new Items { Title = "Levi's Tshirt", Class = "Clothes", Cost = 20 });
Add(new Items { Title = "LED", Class = "Electronics", Cost = 700 });
Add(new Items { Title = "Addidas ZigZag", Class = "Shoes", Cost = 25 });
}
public IEnumerable<Items> GetAll()
{
return products;
}
public Items Get(int id)
{
return products.Find(p => p.Id == id);
}
public Items Add(Items product)
{
if (product == null)
{
throw new ArgumentNullException("product");
}
product.Id = _prodId++;
products.Add(product);
return product;
}
public bool Update(Items product)
{
if (product == null)
{
throw new ArgumentNullException("product");
}
int index = products.FindIndex(p => p.Id == product.Id);
if (index == -1)
{
return false;
}
products.RemoveAt(index);
products.Insert(index,product);
return true;
}
public bool Delete(int id)
{
products.RemoveAll(p => p.Id == id);
return true;
}
}
Here first I have used a variable for the ID of the Product, then I have declared some items that will be shown at run time. Add Product will check whether there is any product available or not, if not then it will throw an exception. Clicking on the "Add" button will increment the ID by one and will add the product in the product category.Product will again work like add but clicking the Update will first remove the product from the category based on it's ID and then will insert it back with the updates applied.The Delete button will simply delete the product determined by the ID of the Product.
Step 4 : Creating Controllers
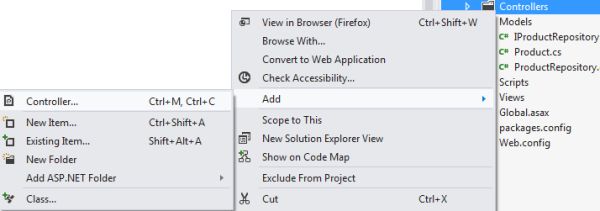
Now we will work on the Controller of our application, so right-click on your Controller Folder and choose to add a new Controller Class.
Add this code to the Controller Class:
public class ProductController : Controller
{
static readonly IProductRepository repository = new ProductRepository();
public ActionResult Product()
{
return View();
}
public JsonResult GetAllProducts()
{
return Json(repository.GetAll(), JsonRequestBehavior.AllowGet);
}
public JsonResult AddProduct(Items item)
{
item = repository.Add(item);
return Json(item, JsonRequestBehavior.AllowGet);
}
public JsonResult EditProduct(int id, Items product)
{
product.Id = id;
if (repository.Update(product))
{
return Json(repository.GetAll(), JsonRequestBehavior.AllowGet);
}
return Json(null);
}
public JsonResult DeleteProduct(int id)
{
if (repository.Delete(id))
{
return Json(new { Status = true }, JsonRequestBehavior.AllowGet);
}
return Json(new { Status = false }, JsonRequestBehavior.AllowGet);
}
}
I have added a View Class in the View folder named product, that's why I wrore ActionResult Product(){ return view();}. This Controller will help the View to show the data whenever it's added, updated or deleted.
Step 5: Knockout Scripts
Our View Class is divided into two parts, the first part is the Knockout Coding and the second part consists of HTML controls declared and bound to the Controller and Model using Knockout. So, we will first work on the first part, in other words the Knockout part. First you need to add an external Knockout-3.2.0.JS and Knockout-3.2.0.debug.js file to your application then write this code:
<script src="~/Scripts/knockout-3.2.0.js"></script>
<script src="@Url.Content("~/Scripts/knockout-3.2.0.debug.js")" type="text/javascript"></script>
<script type="text/javascript">
function formatCurrency(value) {
return "$" + value.toFixed(2);
}
function ProductViewModel() {
var self = this;
self.Id = ko.observable("");
self.Title = ko.observable("");
self.Cost = ko.observable("");
self.Class = ko.observable("");
var Product = {
Id: self.Id,
Title: self.Title,
Cost: self.Cost,
Class: self.Class
};
self.Product = ko.observable();
self.Products = ko.observableArray();
$.ajax({
url: '@Url.Action("GetAllProducts", "Product")',
cache: false,
type: 'GET',
contentType: 'application/json; charset=utf-8',
data: {},
success: function (data) {
self.Products(data);
}
});
self.Total = ko.computed(function () {
var sum = 0;
var arr = self.Products();
for (var i = 0; i < arr.length; i++) {
sum += arr[i].Cost;
}
return sum;
});
self.create = function () {
if (Product.Title() != "" && Product.Cost() != "" && Product.Class() != "") {
$.ajax({
url: '@Url.Action("AddProduct", "Product")',
cache: false,
type: 'POST',
contentType: 'application/json; charset=utf-8',
data: ko.toJSON(Product),
success: function (data) {
self.Products.push(data);
self.Title("");
self.Cost("");
self.Class("");
}
}).fail(
function (xhr, textStatus, err) {
alert(err);
});
}
else {
alert('Please Enter All the Values !!');
}
}
self.delete = function (Product) {
if (confirm('Are you sure to Delete "' + Product.Title + '" product ??')) {
var id = Product.Id;
$.ajax({
url: '@Url.Action("AddProduct", "Product")',
cache: false,
type: 'POST',
contentType: 'application/json; charset=utf-8',
data: ko.toJSON(id),
success: function (data) {
self.Products.remove(Product);
}
}).fail(
function (xhr, textStatus, err) {
alert(err);
});
}
}
self.edit = function (Product) {
self.Product(Product);
}
self.change = function () {
var Product = self.Product();
$.ajax({
url: '@Url.Action("EditProduct", "Product")',
cache: false,
type: 'PUT',
contentType: 'application/json; charset=utf-8',
data: ko.toJSON(Product),
success: function (data) {
self.Products.removeAll();
self.Products(data);
self.Product(null);
alert("Record Updated Successfully");
}
})
.fail(
function (xhr, textStatus, err) {
alert(err);
});
}
self.reset = function () {
self.Title("");
self.Cost("");
self.Class("");
}
self.cancel = function () {
self.Product(null);
}
}
var viewModel = new ProductViewModel();
ko.applyBindings(viewModel);
</script>
Here in the first function I have added a $ sign with the cost and also the cost will be shown with the decimal place, up to two values.Then I declared Observables for ID, Class, Cost, Title and Product. An Observable Array is also created named Products.A computed function is created that will show the sum of all the Price values of all the Products.The Create function will work when the user makes a new entry by clicking on the "Add" button. First, all three Textboxes will be empty, then the user needs to enter some values into all three of these Textboxes, if any TextBox is found empty then an error message will be shown that will ask to enter some value in all the Textboxes, then these entries will be added to the Products Array.The Delete function will work on the ID of the Product, it will delete all the entries at that ID, if this function can't find the ID specified then an error message will be shown.The Change function will use the edit function to edit the values of the of the product based on the ID of that product.Towards the end, two more functions are created, named "reset" and "cancel"; reset will make all the TextBoxes empty and will allow the user to make new entries and the cancel button will cancel all the work done.At the end Binding is applied to the viewModel.
Step 6: Decorating View
Now we will work on the second part of the View Class, in other words on the HTML part. Write the following code where the Script tag ends:
<div id="body">
<h2>CRUD Operations Using Knockout</h2>
<h3>Items List</h3>
<table id="products1" data-bind="visible: Products().length > 0">
<thead>
<tr>
<th>ID</th>
<th>Title</th>
<th>Class</th>
<th>Cost</th>
<th>Actions</th>
</tr>
</thead>
<tbody data-bind="foreach: Products">
<tr>
<td data-bind="text: Id"></td>
<td data-bind="text: Title"></td>
<td data-bind="text: Class"></td>
<td data-bind="text: formatCurrency(Cost)"></td>
<td>
<button data-bind="click: $root.edit">Edit</button>
<button data-bind="click: $root.delete">Delete</button>
</td>
</tr>
</tbody>
<tfoot>
<tr>
<td></td>
<td></td>
<td>Total :</td>
<td data-bind="text: formatCurrency($root.Total())"></td>
<td></td>
</tr>
</tfoot>
</table>
<br />
<div style="border-top: solid 2px #282828; width: 430px; height: 10px"> </div>
<div data-bind="if: Product">
<div>
<h2>Item Updation</h2>
</div>
<div>
<label for="productId" data-bind="visible: false">ID</label>
<label data-bind="text: Product().Id, visible: false"></label>
</div>
<div>
<label for="name">Title</label>
<input data-bind="value: Product().Title" type="text" title="Title" />
</div>
<div>
<label for="category">Class</label>
<input data-bind="value: Product().Class" type="text" title="Class" />
</div>
<div>
<label for="price">Cost</label>
<input data-bind="value: Product().Cost" type="text" title="Cost" />
</div>
<br />
<div>
<button data-bind="click: $root.change">Change</button>
<button data-bind="click: $root.cancel">Cancel</button>
</div>
</div>
<div data-bind="ifnot: Product()">
<div>
<h2>Add Item</h2>
</div>
<div>
<label for="name">Title</label>
<input data-bind="value: $root.Title" type="text" title="Title" />
</div>
<div>
<label for="category">Class</label>
<input data-bind="value: $root.Class" type="text" title="Class" />
</div>
<div>
<label for="price">Cost</label>
<input data-bind="value: $root.Cost" type="text" title="Cost" />
</div>
<br />
<div>
<button data-bind="click: $root.create">O.K</button>
<button data-bind="click: $root.reset">Reset</button>
</div>
</div>
</div>
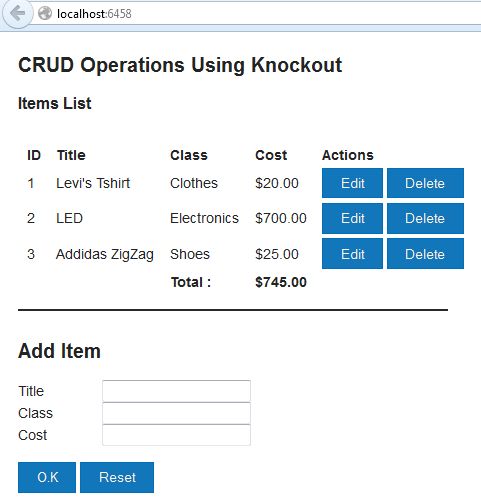
Here I have created a table in which five columns will be used; first for the ID, the second for the Title, the third for the class, the fourth for the Price and the last for Editing or Deleting the record. Headings are provided in the similar order.After providing the headings, four <td> tags are used that are bound to the Id, Title, Class and FormulatedCurrency(cost), so these <td> will show the data relevant to the bound Observable. Formulated Currency will provide the cost with the $ sign and decimal point assigned to it.After creating the table I worked on the "Update" and "Add Item", in the first Div if the user clicks on the "Edit" button then all the records related to that ID will be shown in the Textboxes used in the first Div. At the end of the Textboxes, two buttons are used; the first button will update the old value with the new value and the other button will cancel the update.If the user clicks on the "Add" button then the same Textboxes will insert new values into the Observable Array and they will be shown along with the other Product Details. Here also at the end of Textboxes, two Buttons are used, the first button will make a new entry in the already existing group of Products and the second button will reset all the Textboxes so that the user can enter new values into the Textboxes.Now our application is created and is ready to be executed.
Step 7: Testing & Debuging!
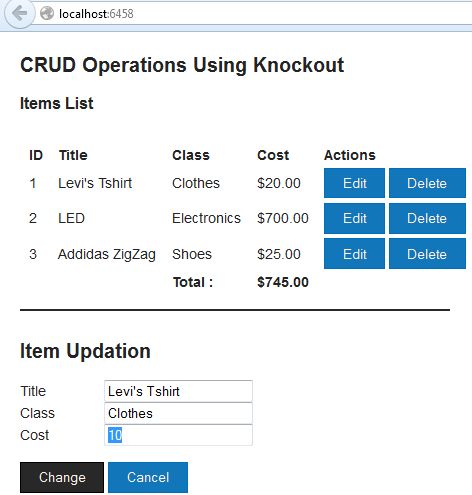
On running the application you will get output like this one:
Here I am clicking on the Edit button so that the updates can be done.
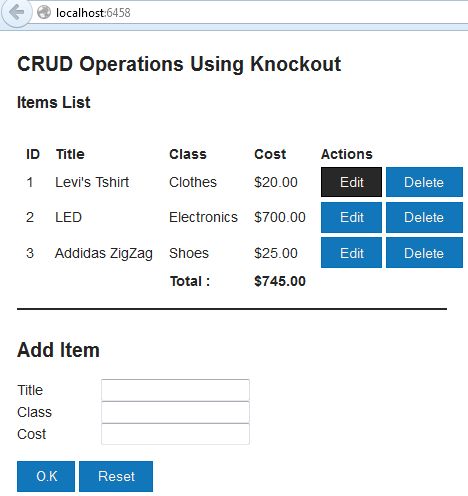
On clicking the "Edit" Button the If condition will get activated and below the Div will start showing the Update Div instead of the "Add New" Div. Here you can make changes and then click on the "Update" button, this will update the preceding products.
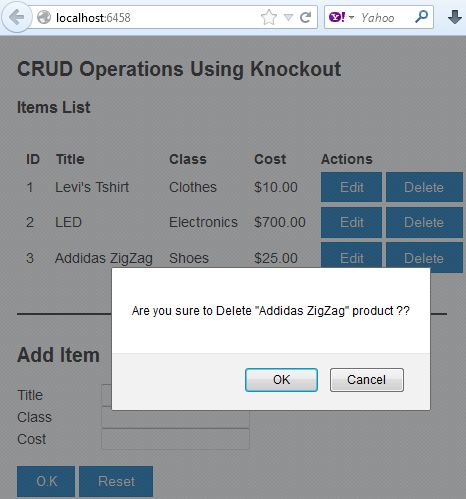
Now I want to delete a Product, so I click on the "Delete" button in front of each row, this will open a Popup to confirm whether you want to delete or not, if you click on the "Ok" Button then that Product will be deleted.

.jpg)


.jpg)
0 comments:
Post a Comment